1. Fampidirana
This manual provides detailed instructions for the installation, configuration, and operation of the GIGABYTE B860 Gaming X WIFI6E Motherboard. Designed to support Intel Core Ultra Processors (Series 2) with an LGA 1851 socket, this ATX motherboard features DDR5 memory support, multiple M.2 slots, PCIe 5.0 connectivity, USB-C, WIFI6E, and 2.5GbE LAN. Adherence to these instructions will ensure proper setup and optimal performance of your system.
2. Information momba ny fiarovana
- Always disconnect the power cord from the electrical outlet before installing or removing any components.
- Manaova fehikibo hato-tanana anti-static na mikasika matetika zavatra metaly efa miraikitra amin'ny tany mba hamoaka herinaratra statika alohan'ny hikirakirana ireo singa.
- Tazomy amin'ny sisiny ireo singa mba tsy hikasika ireo faritra marefo.
- Ataovy izay hahazoana rivotra tsara ao anatin'ny fonon'ny PC-nao mba hisorohana ny hafanana be loatra.
- Arovy amin'ny hamandoana sy ny mari-pana tafahoatra ny motherboard.
3. Ny votoatin'ny fonosana
Verify that all items are present in the package. If any item is missing or damaged, contact your retailer.
- GIGABYTE B860 Gaming X WIFI6E Motherboard
- Boky Torolàlana ho an'ny Mpampiasa / Torolàlana Fametrahana Haingana
- Tariby angona SATA
- Antenna Wi-Fi
- Visy sy Fifandonana M.2
- Driver CD/USB (or download instructions)
4. Fandrindrana ny motherboard
Fantaro tsara ireo singa sy connecteur samihafa ao amin'ny motherboard alohan'ny hametrahana azy.
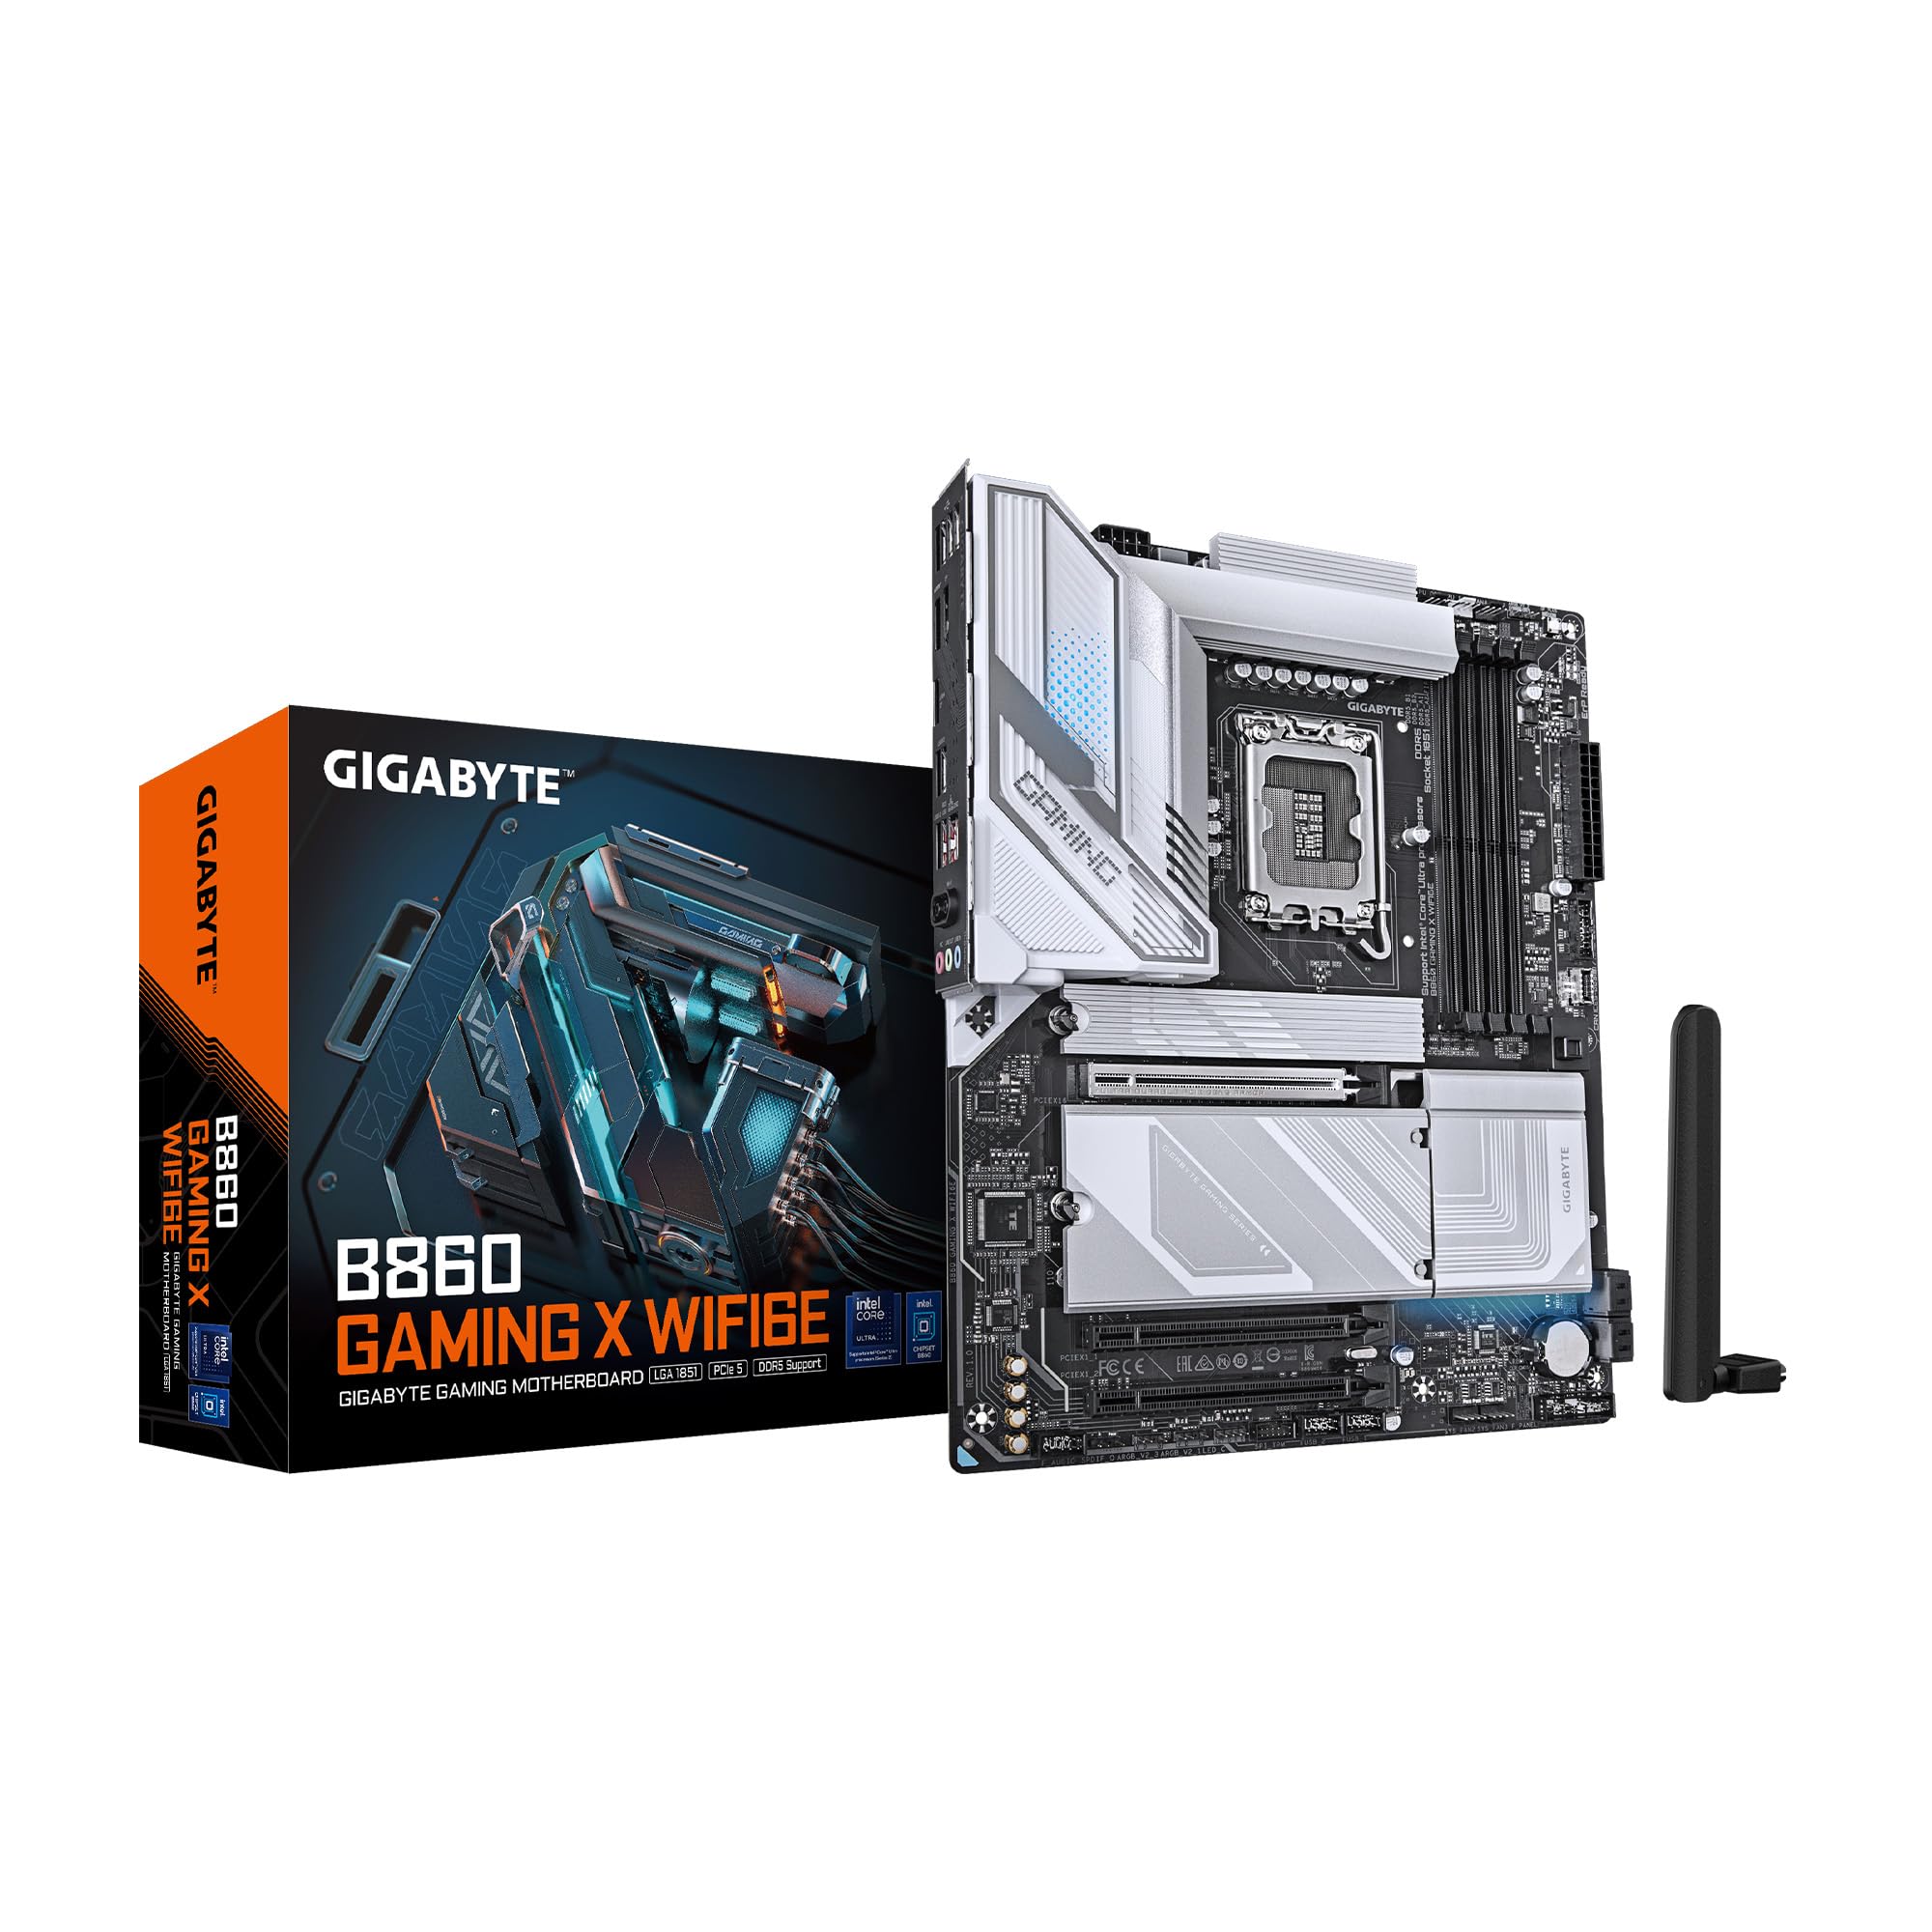
Sary 4.1: Ambony midina view of the GIGABYTE B860 Gaming X WIFI6E Motherboard, showing the CPU socket, DDR5 DIMM slots, PCIe slots, and M.2 slots with heatsinks.

Sary 4.2: Angled view of the GIGABYTE B860 Gaming X WIFI6E Motherboard, highlighting the VRM heatsinks, I/O shroud, and overall board design.
4.1 Rear I/O Panel Overview
The rear I/O panel provides various ports for connecting external devices.

Figure 4.3: Rear I/O panel featuring USB ports, HDMI, DisplayPort, 2.5GbE LAN, Wi-Fi antenna connectors, and audio jacks.
- Port USB: Various USB 2.0, USB 3.2 Gen1, USB 3.2 Gen2, and USB4 Type-C ports for peripheral connectivity.
- Vidéo vokatra: HDMI and DisplayPort for integrated graphics output.
- Port LAN: 2.5 Gigabit Ethernet for high-speed wired network connections.
- Wi-Fi Antenna Connectors: For attaching the included Wi-Fi antenna.
- Audio Jacks: For connecting speakers, headphones, and microphones.
- BIOS Flash Button: For updating BIOS without a CPU or RAM installed.
5. Torolàlana momba ny fametrahana
5.1 Fametrahana CPU
- Open the CPU socket lever and remove the protective cover.
- Ampifanaraho tsara amin'ny socket ny CPU, ary ataovy izay hahazoana antoka fa mifanaraka amin'ny marika eo amin'ny socket ny marika telozoro eo amin'ny CPU.
- Apetraho moramora ao anaty "socket" ny CPU nefa tsy terena.
- Akombony ny lefa mba hiarovana ny CPU.
5.2 Fametrahana ny Fahatsiarovana (RAM)
- Open the clips at both ends of the DDR5 DIMM slots.
- Align the notch on the DDR5 memory module with the key on the DIMM slot.
- Ampidiro tsara ao anatin'ilay lavaka ny môdio fahatsiarovana mandra-piraikitra tsara amin'ny toerany ireo clip.
- For dual-channel operation, install modules in matching color slots (e.g., A2 and B2).
5.3 Storage (M.2 SSDs, SATA Drives) Installation
- M.2 SSD: Remove the M.2 Thermal Guard. Insert the M.2 SSD into the slot at an angle, then push it down and secure it with the EZ-Latch mechanism or screw. Reattach the Thermal Guard.
- Kapila SATA: Connect one end of the SATA data cable to a SATA port on the motherboard and the other end to your SATA storage device. Connect a SATA power cable from your power supply to the device.
5.4 Expansion Card (PCIe) Installation
- Align your PCIe expansion card (e.g., graphics card) with the desired PCIe slot.
- Tsindrio mafy mandra-pipetraky ny karatra tsara ary mandra-pikatona ny clip fitazonana.
- Secure the card to the chassis with a screw.
5.5 Fifandraisana famatsiana herinaratra
- Ampifandraiso amin'ny motherboard ny connecteur herinaratra lehibe ATX 24-pin avy amin'ny famatsiana herinaratra.
- Ampifandraiso amin'ny motherboard ny connecteur power CPU ATX 12V 8-pin (na 4+4-pin).
5.6 Fifandraisana amin'ny tontonana anoloana
Connect the cables from your PC case's front panel (power button, reset button, USB ports, audio jacks, LED indicators) to the corresponding headers on the motherboard. Refer to the motherboard diagram for exact header locations.
6. Fametrahana voalohany ny fanombohana sy ny BIOS
6.1 Fahefana voalohany
After assembling all components, connect your monitor, keyboard, and mouse. Power on your system. The system should display the GIGABYTE splash screen.
6.2 Accessing BIOS/UEFI
During the boot process, repeatedly press the do key to enter the BIOS/UEFI setup utility. Here you can configure system settings, boot order, and monitor hardware status.
6.3 Basic BIOS Settings
- Filaharan'ny fanombohana: Set the primary boot device (e.g., M.2 SSD with OS).
- Daty sy ora: Adjust system date and time.
- Fanaraha-maso ny mpankafy: Configure fan speeds for optimal cooling and noise levels.
- XMP Profile: Enable XMP for your DDR5 memory to run at its rated speed.
7. Fametrahana mpamily sy rindrambaiko
For optimal system performance and stability, install the latest drivers and utilities for your motherboard.
- Mpamily Chipset: Essential for proper communication between the CPU and other components.
- Mpamily LAN: For the 2.5GbE wired network connection.
- Wi-Fi/Bluetooth Drivers: Ho an'ny fifandraisana tsy misy tariby.
- Audio Drivers: For sound functionality.
- Software fitaovana: GIGABYTE provides various utilities for system monitoring, RGB control, and BIOS updates.
Drivers can be found on the included CD/USB or downloaded from the official GIGABYTE website.
8. Fikojakojana
8.1 Fanavaozana BIOS
Regularly check the GIGABYTE website for the latest BIOS versions. BIOS updates can improve system stability, compatibility, and performance. Follow the instructions provided by GIGABYTE for safe BIOS flashing.
8.2 Fanavaozana ny mpamily
Keep your drivers updated to ensure compatibility with new software and hardware, and to benefit from performance improvements and bug fixes.
8.3 Fanadiovana
Periodically clean your PC to prevent dust buildup, which can lead to overheating. Use compressed air to clear dust from heatsinks, fans, and other components. Ensure the system is powered off and unplugged before cleaning.
9. Famahana olana
- Tsy misy hery: Check all power connections (24-pin ATX, 8-pin CPU, GPU power). Ensure the power supply is switched on.
- Tsy misy fampisehoana: Hamarino ny fifandraisana amin'ny monitor sy ny loharanon'ny fidirana. Avereno apetraka ny karatra grafika sy ny môdely RAM. Andramo ampiasaina amin'ny RAM iray ihany ny fanombohana.
- Tsy mandeha tsara ny rafitra: Check for POST (Power-On Self-Test) error codes or beeps. Reseat all components. Clear CMOS by removing the battery or using the clear CMOS jumper.
- Ny singa tsy hita: Ensure the component is properly seated and connected. Check BIOS settings to confirm it is enabled. Update drivers.
- Mafana be loatra: Ensure CPU cooler is properly installed. Check fan connections and fan speeds in BIOS. Clean dust from heatsinks and fans.
10. Famaritana
| endri-javatra | famaritana |
|---|---|
| Marika | GIGABYTE |
| ANDIAN-DAHATSORATRA | B860 GAMING X WIFI6E |
| Laharana modely | B860 GAMING X WIFI6E |
| CPU Socket | Intel LGA 1851 |
| Processeurs mifanaraka | Intel Ultra Core Series 2 |
| RAM Memory Technology | DDR5 |
| RAM Slots | 4 DIMM |
| Hafainganam-pahatsiarovana | 5600 MHz |
| Karazana Chipset | Intel B860 |
| PCIe Slots | PCIe 5.0 (for graphics card) |
| M.2 Slots | 3x M.2 Slots |
| USB Connectivity | USB-C and other USB ports |
| LAN | 2.5GbE LAN |
| Wireless fifandraisana | WIFI6E |
| Power Design | 12+1+2+1, 50A PPAK VRM |
| Thermals | MOSFET Heatsink, M.2 Thermal Guard |
| Form Factor | ATX |
| Ny refin'ny vokatra | 12 x 9.6 x 1 santimetatra |
| Lanja entana | 4.2 kg |
| Platform | Windows 11 |
11. Fampahalalana momba ny fiantohana
GIGABYTE motherboards typically come with a limited manufacturer's warranty. The specific terms and duration of the warranty may vary by region and retailer. Please retain your proof of purchase for warranty claims. For detailed warranty information, refer to the official GIGABYTE webtranokala na mifandray amin'ny toerana nividiananao.
12. Fanohanana ara-teknika
If you encounter issues that cannot be resolved using this manual or the troubleshooting section, please contact GIGABYTE technical support.
- GIGABYTE Ofisialy Webtranokala: www.gigabyte.com
- Jereo ny fizarana fanohanana amin'ny website for FAQs, driver downloads, and contact information for your region.