Sava lalana
The Hyperkin RepairBox IPS Upgrade Kit is designed to modernize the display of your Original Game Boy (DMG-01). This kit replaces the original screen with a high-quality IPS display, offering significantly improved brightness, contrast, and wide viewing angles. Experience your classic games with enhanced visual clarity while maintaining the authentic look and feel of your original console.
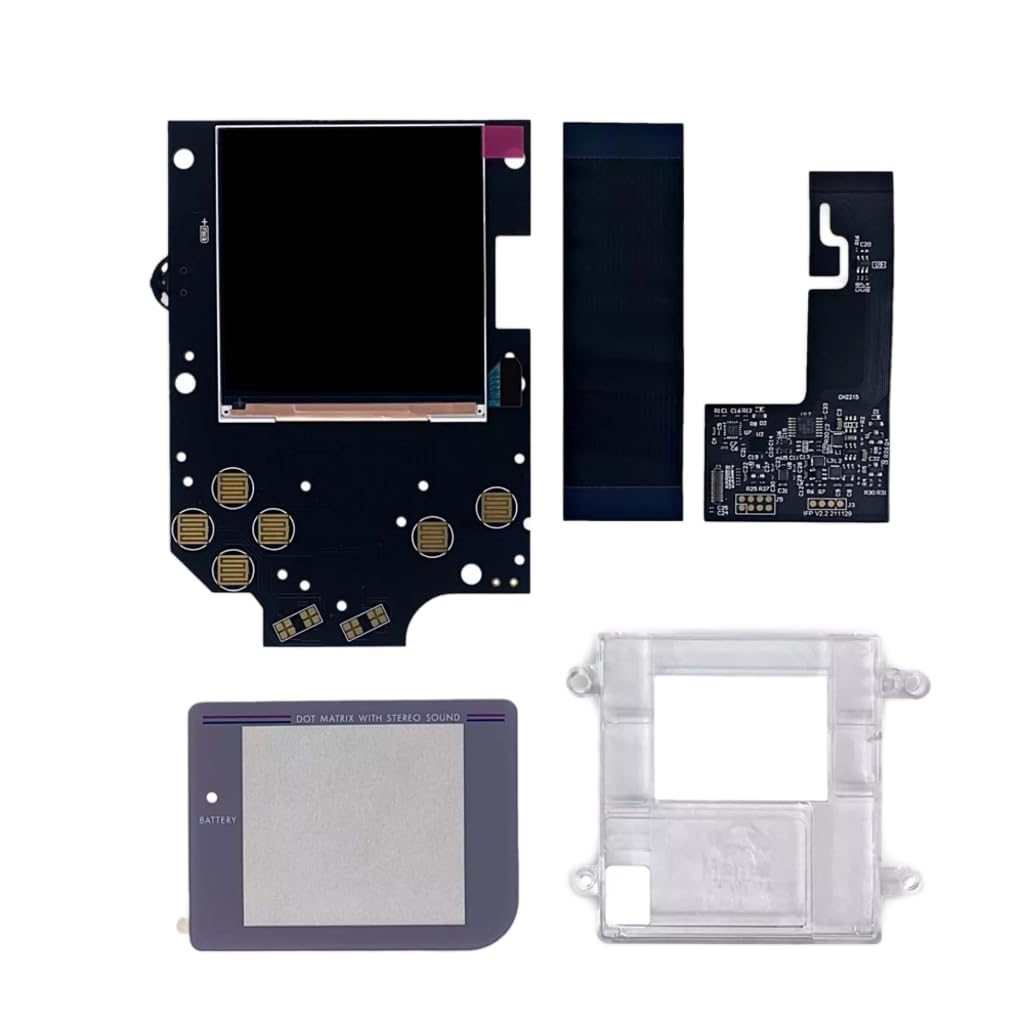
Image: The Hyperkin RepairBox IPS Upgrade Kit, showcasing the main display module and associated components.
Fampahalalana manan-danja momba ny fiarovana sy fitandremana
Please read and understand the following safety information before proceeding with installation:
- This product contains precision electronic components. Installation requires careful handling and experience with static electricity countermeasures and electronic device disassembly.
- If you are not confident in your ability to perform the installation, it is highly recommended to consult a professional technician.
- Installation and any subsequent modifications to your device using this kit are performed at your own risk. Hyperkin is not responsible for any damage, malfunction, or issues that may arise during or after the installation process.
- Ensure you have the correct model kit for your device. This kit is specifically designed for the Original Game Boy (DMG-01). Verify your Game Boy model number before starting.
- Always disconnect power and remove batteries from your Game Boy before beginning any disassembly or installation.
Fonosana fonosana
The Hyperkin RepairBox IPS Upgrade Kit (M07688) typically includes the following components:
- IPS Display Module
- Custom PCB (Printed Circuit Board) for display control
- Ribbon Cables for connection
- Mounting Brackets or Frame (for secure fit)
- Necessary small components for installation

Sary: Nisy nipoaka view illustrating the various components included in the IPS upgrade kit, such as the display, circuit board, and mounting parts.
Fametrahana sy fametrahana
This section outlines the general steps for installing the Hyperkin RepairBox IPS Upgrade Kit into your Original Game Boy (DMG-01). Due to the delicate nature of the components and the requirement for precise handling, detailed step-by-step instructions with specific soldering points or exact screw locations are beyond the scope of this general manual. Refer to official Hyperkin installation guides or reputable online tutorials for comprehensive visual instructions.
- Omano ny toeram-piasanao: Ensure a clean, well-lit, and static-free environment. Gather necessary tools, including a tri-wing screwdriver, Phillips head screwdriver, spudger, and potentially a soldering iron if required by the specific kit version.
- Disassemble the Game Boy: Carefully open your Original Game Boy by removing the necessary screws. Separate the front and back shells. Disconnect the ribbon cable connecting the original display to the main PCB.
- Remove Original Display: Gently remove the old LCD panel and any associated components from the front shell. Clean any adhesive residue.
- Install New IPS Display: Position the new IPS display module and its custom PCB into the front shell. The kit is designed for a seamless, retro-compatible fit, often requiring minimal or no shell modification. Secure it using the provided mounting brackets or adhesive.
- Connect Ribbon Cables: Carefully connect the new IPS display's ribbon cable(s) to the custom PCB and then to the Game Boy's main PCB. Ensure all connections are secure and properly seated. Avoid bending or creasing the ribbon cables sharply.
- Fampiasana fitsapana: Before fully reassembling, temporarily connect the battery and power on the Game Boy to test the new display. Verify that the screen powers on, displays correctly, and has no visible defects.
- Reassemble the Game Boy: If the test is successful, carefully reassemble the Game Boy, ensuring all components are properly aligned and screws are tightened appropriately. Do not overtighten.

Sary: A antsipirihany view of a circuit board, likely part of the display controller, showing connection points.

Image: The IPS display module, the core component of the upgrade kit, ready for installation.
Torolàlana miasa
Once the Hyperkin RepairBox IPS Upgrade Kit is successfully installed, your Original Game Boy will operate as usual, but with a significantly enhanced visual experience. There are no special operating procedures required for the IPS display itself.
- Herim-batana: Turn on your Game Boy using the original power switch.
- Enjoy Enhanced Visuals: The IPS display will provide a bright, vibrant, and clear image with excellent contrast and wide viewing angles, making your classic games more enjoyable.
- Lalao lalao: Insert your Game Boy cartridges and play as you normally would. The display upgrade does not alter gameplay mechanics.
fikarakarana
To ensure the longevity and optimal performance of your upgraded Game Boy and IPS display, follow these maintenance guidelines:
- Manadio ny efijery: Mampiasà lamba malefaka sady tsy misy loko, dampened with water or a screen-safe cleaner, to gently wipe the display. Avoid harsh chemicals or abrasive materials.
- Fanadiovana ankapobeny: Keep the Game Boy's exterior clean and free from dust and debris.
- fitahirizana: Store your Game Boy in a cool, dry place away from direct sunlight and extreme temperatures.
- Fikarakarana: Avoid dropping the device or subjecting it to strong impacts, as this can damage the internal components, including the new display.
Fanamboarana
If you encounter issues after installing the Hyperkin RepairBox IPS Upgrade Kit, consider the following troubleshooting steps:
- Tsy misy fampisehoana/Ecran mainty:
- Ataovy azo antoka fa feno na soloina ny bateria.
- Verify all ribbon cables are securely connected to both the IPS display PCB and the Game Boy's main PCB.
- Hamarino raha misy fahasimbana hita amin'ny tariby na mpampitohy.
- Confirm the power switch is fully engaged.
- Sary miredareda na mikorontana:
- Re-seat all ribbon cable connections.
- Check for any loose components or debris inside the console.
- Ensure the display module is properly seated and not under undue pressure.
- Incorrect Colors or Brightness:
- This kit typically does not have user-adjustable color or brightness settings. If colors appear incorrect, re-check connections.
- Ensure the kit is compatible with your specific DMG-01 revision, if applicable.
- Physical Damage to Screen: If the screen is cracked or physically damaged, it will require replacement. This is not covered under warranty for user-induced damage.
If these steps do not resolve the issue, it is recommended to seek assistance from an experienced technician or contact Hyperkin customer support.
fepetra arahana
| Laharana modely | M07688 |
| Console mifanentana | Original DMG Game Boy® (DMG-01) |
| Karazana fampisehoana | IPS LCD |
| Endri-javatra fototra | High Brightness, High Contrast, Wide Viewing Angle, Retro-Compatible Design for Seamless Shell Integration |
| Ny haben'ny fonosana | 15.3 x 10.2 x 2.7 cm |
| Lanja fonosana | 77 g |
| LASA | CHINE |
Warranty sy fanohanana
Hyperkin stands by the quality of its products. However, please note the following regarding warranty and support for the RepairBox IPS Upgrade Kit:
- Andraikitra fametrahana: As stated in the Important Safety Information, the installation and modification of this product are undertaken at your own risk. Hyperkin is not liable for any issues, damages, or malfunctions that occur during or as a result of the installation process.
- Product Defects: If you believe the Hyperkin RepairBox IPS Upgrade Kit itself has a manufacturing defect upon receipt, please contact Hyperkin customer support or your retailer immediately.
- Tohana ara-teknika: For technical assistance or inquiries regarding the product, please visit the official Hyperkin webtranokala na mifandray amin'ny departemantan'ny serivisy mpanjifany.
- Disclaimer: RepairBox™ is a registered trademark of Hyperkin, Inc. Original DMG Game Boy® is a trademark or registered trademark of Nintendo of America Inc. This product is not designed, manufactured, approved, or licensed by Nintendo.
For the most up-to-date warranty information and support resources, please refer to the official Hyperkin webtranokala: www.hyperkin.com